Friday, March 29, 2013

Skissedilla #203

Hello there!  My much anticipated plans of being back soon were foiled yet again.  Taking care of my really sick kiddo (not really a kiddo anymore at 16 but still) has been top priority number one....and boy oh boy has he been hit hard this time around.  Poor guy.  Glad to report he's on the up and up now and things should get back to normal soon....fingers crossed, prayers said. 

This week's sketch was created by the beautiful Maria of Scrap Art Design
But there is also reason to celebrate because Skissedilla had a birthday!!!  Yep, the site turned 4 years old last Sunday with over 200 sketches being put out during those years, wow.  I feel so proud and blessed to be a part of this amazing team and love the girls and guy I work with there so much!


For my take this week I rotated the sketch 90 degrees and then had a ton of fun with my watercolors along with one of the new ScrapFX stencils - Daisy Garden - to create the background.  From there I cut up a few bits and pieces from the American Crafts Dear Lizzy Lucky Charm Line and I was done. *I totally love how this play by play makes it sound like this page came together in a breeze - I actually fussed and mussed quite a bit but essentially this is the gist of it. ;)


Not sure why this shot looks a tad grainy or... but thought perhaps you'd want to see the focal point more up close? The hot air balloons are made paper pieced from Memory Maker dies I picked up from the Crop Stop.  Yes they took a bit of time to make, but oh so worth it - they make me giddy!!  Another favorite feature for me is the turtle :)  My daughter had been begging me to use this on a project - not specifically one with her on it - but just one in general so it seemed fitting to use on this page with her and her BFF.  

There is still time for you to join in on the fun and play along with us!  This week we have wonderful prizes for all our winners and we'd love to have a grand showing for our birthday!!  Hope to see you there!


Wednesday, March 20, 2013

A Sneak, A Winner, and An Award

Hi Sweetie Peeps, long time delay in blog!!  Sorry for that.  We've been plagued with strep throat and the flu - blech!!  Spring cannot get here quick enough and in fact Winter is still in full swing.  Geesh.  Its been snowing and its only 4 degrees so far here today with windchills below zero - yeah, not a happy camper here - at all.  Yet I've got hope because Spring does indeed have to come. It inevitably arrives every year, no matter how late, and despite the weather outside still being frightful I decided it was time to create my own bit of Springtime bliss!!


This is a sneaky peek of my latest ScrapFX page coming soon to the blog.  Lots of flowers, butterflies, and springtime colors to get my spirit in the mood!!  Totally smitten on my deer die from the Crop Stop lately - you'll be seeing these sweet creatures on many projects to come I'm sure.  Normally not a flower child here, LOL, I tend to collect them more so than use them. I went ga-ga for these particular ones though and had go to town right away - tutorial to come with reveal :D

Speaking of tutorials - its been a bit since we've had one here huh??  I shall get on it that for you all.  Still have my list of wants from all you lovlies.  Feel free to add any requests in the comments at any time!!

Thank you to all those that hopped through the MSW card blog hop and left lovin' on my take of the sketch!!  My winner of a ScrapFX RAK is the 13th commenter......

Faye Marie
I like that you turned the sketch on it's side. The deer are a great touch!! Love it!!!

Faye Marie please contact me with your mailing info so I can get you a goodie package set and sent out.


I want to close this post by thanking a couple special ladies for presenting me and my blog with this award!!  A big thank you to Joan of the The Gov's Place and Jo of Jo's Scrap of Difference for thinking of me and my work so kindly.  The words they shared were amazing and I'm ever so humbled.  I'll be sharing more on this award soon as its a share the love, pass it on kind of thing but I wanted to be sure I recognized these sweet gals. Ooodles of thanks for brightening my days ladies!!!

With that I shall close for this time and get crackin' on all the creative things I need and want to do.  What's on tap in your creative world??  Spring projects in motion? I do hope the weather is treating you kinder than ours is.  Until next time, take good care!!

Friday, March 15, 2013

My Sketch World Blog Hop!!

Hi There and Welcome to the My Sketch World Card Blog Hop!! 

It has been such an honor and delight to work with Lucy and the My Sketch World sketches for a number of years and I'm delighted to be back on the team as the Inspiration Designer!  Lucy's sketches are always amazing to work with and the one she has provided with for the hop is no exception, check it out:


For my card I decided to rotate the sketch to the left, thus making my design look like this: 

I added a bit of modeling paste to the corners of the base piece of patterned paper using a woodgrain Crafter's Workshop stencil and then brushed with some color - I wanted this piece of paper to have some subtle texture staying true to the pattern already on it.  From there I continued to build up a simple rustic theme card with a few artsy elements thrown in.
In playing with the sketch I also changed up the center panel to a circular element and slide it over, allowing the background work I created to show, and the diamonds became deer :)  I really love how using sketches inspire various creativity as you will see throughout the hop!!  

A close up:

The star background paper of this card is embossed with a Crafter's Workshop cloud stencil, then colored with some Pan Pastels and highlighted with pen work to make the images pop!  To see another sample of this technique you can go here.
 The low down on the hop is this: 

Start at the My Sketch World blog and visit each of the designer's blogs.  Leave a comment at each blog and you will be in the running for a $20 GC to your choice of online store!  I will be drawing for a ScrapFX RAK from the comments I receive.  All comments must be made by midnight PST, March 17th.

Here's the line up for you to follow (be sure to leave 2 comments at the MSW blog):

My Sketch World Blog http://mysketchworld.blogspot.com/
Scarlett Salamone (Inspiration Blog Designer) http://scarlettsscrapoirs.blogspot.com/ <-you are="" br="" here=""> Debbie Lacy http://scrapenabler.blogspot.com/
Karen Zabuska http://www.calmcreations.blogspot.com/
Lisa Moen http://www.lisasscrappyhideaway.blogspot.com/
Majo Wybranietz http://majos-art.blogspot.com/
Jan Tatomir http://www.jantatomir.blogspot.com/   
 My Sketch World Blog http://mysketchworld.blogspot.com/

 Thanks so much for stopping by and hope you have a terrific time hopping along with the MSW card team!! 


Monday, March 11, 2013

New Attitude - Skissedilla Sketch #201

Hi Everyone and Happy Monday!!  Did you handle springing ahead??? Ahh, I really dislike having to do that each year, and today just really feeling it, especially since I just looked at the clock and saw it was already one. Sigh.... days just go too fast for a while until everything adjusts, but I guess. But you came here to check out my page and the new sketch from Skissedilla so on with the program!


My daughter is a newly turned teen - oh yeah fun stuff - truly, well most days, LOL - and I love capturing all her funny faces. She is never camera shy with these, though at times I wish she was because getting a decent shot doesn't exactly happen anymore...geesh.  But this is definitely her personality at the moment and so I guess in the grand scheme of capturing memories that is what its all about.

I turned the sketch upside down, followed it, and added a few more embellishments/design elements to draw attention to me title/text.


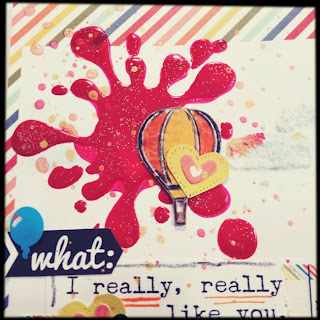
Here you can see I used one of my ScrapFX Splat! embellishments (tutorial can be found here) as well as another ScrapFX stencil embellishment tucked underneath the photo to draw attention to the stamped word.  


Here you can see the ScrapFX Chevron stencil embellishments I made better.  The title I created is hand painted, then outlined with pen, on some patterned paper scraps I swiped gesso over.  I wanted the words to go along with the Heidi Swapp sticker word I used along side of the picture.  The chevron embellies really helped make these tiny words stand out as they were getting lost on the page by themselves.  Lots of tiny doodling lines here and there to go along with the patterns already present on the Sassafras paper....gosh I miss them....and that was that.  Pretty quick and easy page this time.  


This lets you see the various paper layers, textures from mediums pounced on the background, confetti adhered in it, etc perhaps a little better.

I hope to see you playing along this week at Skissedilla!!  Its my turn hosting the blog so I'd love to have lots of friends stopping by and to visit throughout the week!

Take care and have great starts to your weeks!

Friday, March 8, 2013

ScrapFX Splat! Tutorial and Page Reveal

Happy Friday Sweetie Peeps!  So sorry I didn't make it here yesterday.  Truth be told I was horribly distracted by other things, lost track of time, and didn't want to rush this leaving you with a poor quality tutorial.  The good news in all that is I've got other things in the works for the future that will be exciting to share!! For now, lets get moving and shaking with some Splats!!


This is the detail from the page that sparked today's tutorial.  The supplies needed are as follows:

Paper (patterned paper, cardstock, or any paper of choosing - you can cut embellies out and adhere)
Liquitex String Gel
Coloring Medium (in my case paint)


Step One: Use a palette knife to grab some string gel and put it on your craft mat.  Add paint to the string gel in preparation for mixing.

Things to Note About String Gel:
It is a self leveling gel - meaning no matter what you do it will work its way around to level out so you have to be sure the surface you work on is level!
It is stringy - hence the name - making it a bit tricky to work with at first.  Don't get frustrated.  Take time to play with it and learn how it may best fit your style and needs - also you may not like it all.  Its okay.
It is very sticky and honey like.  Know this and be prepared when working with it, clean up quickly when done.
There are more things I could tell you, in fact a few years ago I wrote an entire article for Scrapbook News and Review Magazine devoted to string and tar gel, made by Golden.  I can find it on my old computer if you'd like to know more on these mediums, they are my favs!!! Let me know. Moving on.

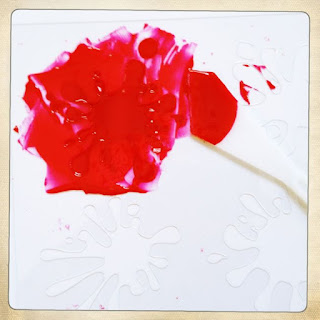
Here I've lifted the palette knife and let the string gel drizzle to show you how it pours and to hopefully give you an idea of the consistency.  Can you tell?
 Step Two: Mix together the String gel and paint.  Do this in a chopping action, do not stir it up.  Stirring it up will cause an excess of air bubbles.
  

Step Three: Position your ScrapFX Splat Stencil on your paper.  Scoop some of the mixed string gel onto a palette knife (old credit card if you don't have a knife) and begin to quickly spread over splat of your choice.  Be generous with the amount of gel you spread in order to get a nice dimensional effect.


Step Four: Remove the stencil and the above photo is what your paper should look like.  At this point you can stop or you continue on to the next step.  Note: The gel I mixed together was enough to cover and create three splats - it spreads and goes a long way.

Adding little extras to mediums while still wet is something I enjoy.  There are so many options you can go with to really give them that little something and make them your own.  For this project its a very simple boost - glitter.
Step Five: While the string gel is still wet sprinkle a light dusting of glitter over the top of the splats randomly.  Do this as much or as little as you please.  For my ScrapFX page, I used gold glitter to match the elements I had going on - these splats however, don't have a project yet so I've gone with crystal glitter to match whatever project they may land on in the future.


A splat up close for you to see the dimension and shimmer achieved! 

And here's the full reveal of my latest ScrapFX page featuring these Splats! decked out in gold glitter:


Thanks so much for stopping by!!  I hope you enjoyed the tutorial and if you try it out, link me up so I can check out what you did with it!

Have a super start to your weekend! I'll be back soon with a new Flashback post and more - I haven't forgotten, just been busy, busy!!!  Have my bestie and her daughter coming in from SD this weekend too to stay for a couple weeks! YAY!
Take care!!!


Wednesday, March 6, 2013

New ScrapFX Post & Upcoming Tutorial Sneak!

Evening Friends! My how time flies when you're creating like a mad woman, playing taxi driver, running our kennel, and battling snowstorms - yes we are still having snowstorms!!! UGH! Seriously??  I've set my thoughts on Spring however by creating up a storm with bright, bold colors!!


See, I told you!  I grabbed what few bits of the new Glitz Design Color Me Happy collection I've managed to get my hands on to create a page for my latest post up on the ScrapFX blog.  Rather crazy to be scrapping a page on my daughter's 10th birthday since she just 13! Can you tell I'm not a chronological scrapper?? 

 
This Crayon Frame (2012365) was the main inspiration for my page.  I really love this piece and all the possibilities it holds.


After the frame and photo were chosen came this fantabulous splat!!  It was created using the Splat Stencil (2012170) and this is what I'll be delivering you a tutorial on!  I had an Instagram follower/friend inquire how I made this after I posted a sneaky peek there (follow me @kndr2tch if you'd like) and when I shared some insight it struck me the verbal directions were okay - visual would be better. :)  So yep that is what will happen.  Since I wasn't fully planning on this its still in the works - real life has a way of taking some creative time away - ha!

Oh and remember the Butterfly Brooch sneak I shared here?  Well it's all set to go on a card and will fly its way to a sweetie friend soon. I'll be able to share this reveal soon too.


So I'd love for you to head on over to the ScrapFX blog and check out my full page.  I'll be back again tomorrow I do believe with a Splat! tutorial for you.  
 
I also want to thank those of you that stopped by my last post, left me love on my mini book, and feedback on what you want to learn about!!  I've taken my notes and will get it going on for ya'! :D  So excited and even working on my video skills...aww yeah!!!

Take care sweetie peeps, see you tomorrow.