Tuesday, February 21, 2012

Stamp Carving

Oh how I've wanted to get here to post some new shares with you all.  My DDs birthday and life in general kind of took over  - and we've yet to have the sleepover, LOL.  DDs schedule is so full its hard to find a free weekend.

Anyways, I wanted to show you the new stamp I carved:

I was very much inspired by a video posted in the SNR forum by my fellow staffer Christy.  She knows how I obsess   delight in clouds and I already started a new cloud project because of it.  The shocker for me was after I watched the video I couldn't get the stamps used out of my head.  I knew I had to make my own version and this is the first.  I've made another large stamp - love and a smaller one fly.  I'm really glad I decided to try this on my own because a. it was super easy and b. its my own handwriting!!   Do you have any great ideas for words I could try?  Have you carved stamps?

Sunday, February 12, 2012

Squeaking One In

Happy Sunday!  I'm stopping by the ol' blog to squeak in the LO I created for Skissedilla's sketch this week.  I'd been working on it, then had to push it aside, saw it today and decided to finish.  Just in the knick of time too as entries close in like 40 something minutes, LOL.  Anyhoo, here's my take on the sketch this week:

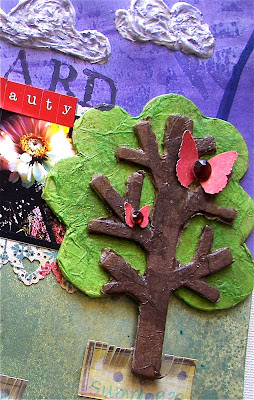
I covered this Maya Road chipboard tree with tissue paper and then sprayed it with mists - can't the sparkle but its there - journaling over gessoed strips of paper

I misted the background through a mask then used Pan Pastels over it - so cool the design still shows through and so does the shimmer - in fact the mist shimmer looks better under the pastels - modeling paste clouds brushed heavily with Shimmerz pearlz - stitched 'rain' coming down and Maya Road beads for drops.

I really can't believe how this page came together because it was a hot mess for a while thus the reasoning for me squeaking this one in - background took a bit to come together - thought I ruined it by adding the blue drips of ink - much simpler than most of my creations - I like simple
Here's the sketch and if you're loving on the Skissedilla sketches like I am be sure to check out their DT call. 


Have a great one!
P.S. - If anyone can tell me how to get the Google translate gadget linked up on my sidebar I'd love it!  I tried through Blogger and the gadget is broke - are there other options?  Thanks so much!

Wednesday, February 8, 2012

I {Heart} U

Evening.  Quick post tonight as its been a long day.  I wanted to share the most recent LO I made however for the MSW Sketch-A-Thon.

I started with a grid piece of patterned paper.  Have I ever told you how much I love grid paper?  I used watermark ink through a stencil and embossed the squares around the edges.  Next came a generous spraying of mist, inking through a stencil, and splatters.  I layered up all my patterned papers, bits and bobs, and declared it good.

I had to use this picture and even though its not the best one, it does show the best heart hands they made together.  You can also see how I embossed the sticker letters and added glitter to the birds.
I plan on linking this up to the Paper Issues challenge this month.  It'll be my first time playing along there.

I'm having such a great time cranking out pages and cards.  If you need something to do, you should join in.  Night.

Monday, February 6, 2012

A LO and a Card

Happy Monday Peeps.  Hope weekends were enjoyable and time with loved ones abundant.  Half of my weekend was spent watching DD play softball at an indoor tourney and the other was spent relaxing and scrapping, so all around a great weekend.  
 
Two of my favorite sites, MSW and Let's Scrap,  have lots of fun stuff going for the month of February so you'll wanna check them out.  Lots of awesome sketchiness and super fun prizes.... but the best part are all the ladies.  So many wonderful, inspiring friends to hang out with. 

I'm elated that I actually got going on Lucy Lou's Sketch-A-Thon.  Its been soo long since I played along there and it felt so good to knock out one of the 6 sketches that have been posted so far....I'm running a little behind LOL ; )  Here's a card I had a tremendously good time creating:
 
Chipboard, Molding Paste, Modeling Paste, Ink, and Shimmer oh my!  I don't think I'll ever tire grabbing for these supplies or using clouds, raindrops, and rainbows in my creations.


The background was created by using a combo of mists and ink to go over the patterned paper and pastes that were applied.  I altered up the chipboard with paint, pastes, shimmer, and glaze. Supplies Used: Sassafras papers and sticker, Maya Road chipboard and doily, Liquitex and Golden pastes, Crater's Workshop stencil, Studio Calico stamp, October Afternoon sticker
Here's the sketch:
Speaking of sketches check out this week's from Let's Scrap:
Suer fun with those strips of paper right?  The minute I saw those cloud shapes I was sold on having to get this one done.
One of my favorite Sassafras lines - Bungle Jungle animals in effect.  I highlighted the papers by brushing metallic paint over some areas and also adding puffy paint.  I heart puffy paint.  Some buttons for the giraffe and it was painted with some orange mist since I didn't seem to have any orange metallic paint.  I NEED to get some. A couple Maya Road pins, a Crate paper brad, and the hot air balloon is a stamp from Studio Calico.   Journaling done of cloud sticker made by Sass.


I've been holding on to this cutie lil helicopter for a long time and am so glad to finally rid it from my stash and onto a page.  I spruced it up a bit with some Perfect Pearls and added the brad so I could attach the twine for the banner.  Here you can also see the stars stamped on with gold paint and some of the mist splatters.
This LO while fun and playful really tugs at my heart strings.  Its all about how my boy (not really so much a boy anymore) finally outgrowing me.  He waited and waited for this moment, so elated when it came.  For me it was exciting to know he was growing up, but bittersweet knowing how quickly he'll be off.
Thanks for stopping by today.  Hope you've found something to make you smile, if not go do so, no time like the present.

Sunday, February 5, 2012

Liebster Award

My friend and fellow SNR staff member Dana surprised me with the Liebster Award.  Thanks Dana!

Here's a bit about the award borrowed from Dana's blog to share with you:


"Liebster" is a German word meaning dearest, beloved or favorite, and the Liebster Award is sort of a chain letter among bloggers that's intended to showcase exceptional up-and-coming blogs (typically, those with 200 or fewer followers). Now, there's no evaluation committee or formal award process for the Liebster, but in a way it's even nicer – it's recognition that a peer has noticed and appreciated your hard work.

Here are the rules:

*Choose 5 up-and-coming blogs of fewer than 200 followers to award the Liebster.
*Show your thanks to the blogger who gave you the award by linking back to them.
*Post the award on your blog.
*Link back to the blogs you have given the Liebster to so everyone else can pay them a visit.

Here are 5 blogs I delight in visiting right now.  Some are friends blogs and others don't know me but I love to look at their creations. Please take a few moments to check them out, you'll be really glad you did!

BTW - Be sure to check out Dana too!  She rocks.

My Take

Hey there.  Hope your weekends are going fabulously.  I spent yesterday at an indoor softball tourney my DD had.  My DS came along to keep me company and we all had a really wonderful day.....long and tiring, but wonderful.  Another wonderful thing in my world is when I find new sketch sites to check out.  Lately I've been stalking the Skissedilla blog and this week I finally got a LO done using one of their sketches.  
I made this:
 Using this sketch:

 My take is essentially much busier than the sketch, but the basis of its still there.  That's what I adore about sketches.... they can be used a jump off point to get things started and the rest goes wherever the page leads you.

Here are a couple quick deet shots for you:
I used a peeling paint technique to reveal the patterned paper used as my base and then went over it with lots of mists, gesso, and ink to grunge up the background.
I added some trim to the bottoms of the clouds and layered up lots of Sassafras papers that had been cut apart.  I love how the twine turned out for the girl to be holding on to.  Twine seems to be my latest obsession.  I'm constantly looking for ways to include it on what I make.
 I'm hoping I make it back here today because that would mean I actually got some things done for the Sketch-A-Thon going on over at My Sketch World.  Lucy's celebrating her 6th Anniversary of having MSW and our gifts are sketches everyday!!  WaHoo.  Hope you pop by and join in the fun.  There are a TON of great prizes and things up for grabs!


Thursday, February 2, 2012

Thursday Tutorial

Hey Peeps.  Lots of creative juices flowing these days although I can't share everything with you yet.  In the meantime I thought I'd post a past tutorial I did for SNR magazine.  Its another ATC, but I encourage you to see how the techniques involved could be used on projects you like to do.

Two Hearts ATC Tutorial
 
Two Hearts by Scarlett Salamone Supplies Patterned Paper: Little Yellow Bicycle, Bo Bunny; Brads: The Paper Studio; Gel medium: Liquitex; Tar Gel: Golden; Paint: Jacquard; Other: Confetti, mesh, ticket, cardboard  

Supplies:  Cardboard, Gel Medium, Tar Gel, Brads, Fabric, Netting, Paint, Patterned Paper, Confetti

Step One: Adhere patterned papers to cardboard using gel medium or adhesive of your choice.

Step Two: Mix confetti with some gel medium and spread onto base.

Step Three: Cut out two hearts from fabric and two from netting.  Stitch together.

Step Four: Crinkle up a ticket and add paint to the edges/wrinkles using your fingertips.
Step Five: Adhere tickets and hearts to base using gel medium.

Step Six: use a wire cutting tool to snip the backs off the key and lock brads and adhere to base using gel medium.  You could surely keep the backs of the brads on, but this is my little trick to not have a hole poking through the back of my project.

Step Seven: To finish off the ATC, mix tar gel (not shown) and paint together and spread generously around the edges by scrapping the mixture off a brush onto the edge.

Here's the finished project one more time:

If you have any questions just holla' and I'll help the best I can.

Until next time, take care.